Lightroom Tutorial – Exporting Images for Print & Web
How To Export Images for Print and Web
and Get perfect Results Every Time
“How should I export my images from Lightroom for print and web use?”
This is a question that comes up more frequently than any other question within our Click Love Grow community.
So we’ve created this post to address all those frequently asked questions related to exporting images from Lightroom, in simple language that we promise won’t put you to sleep!
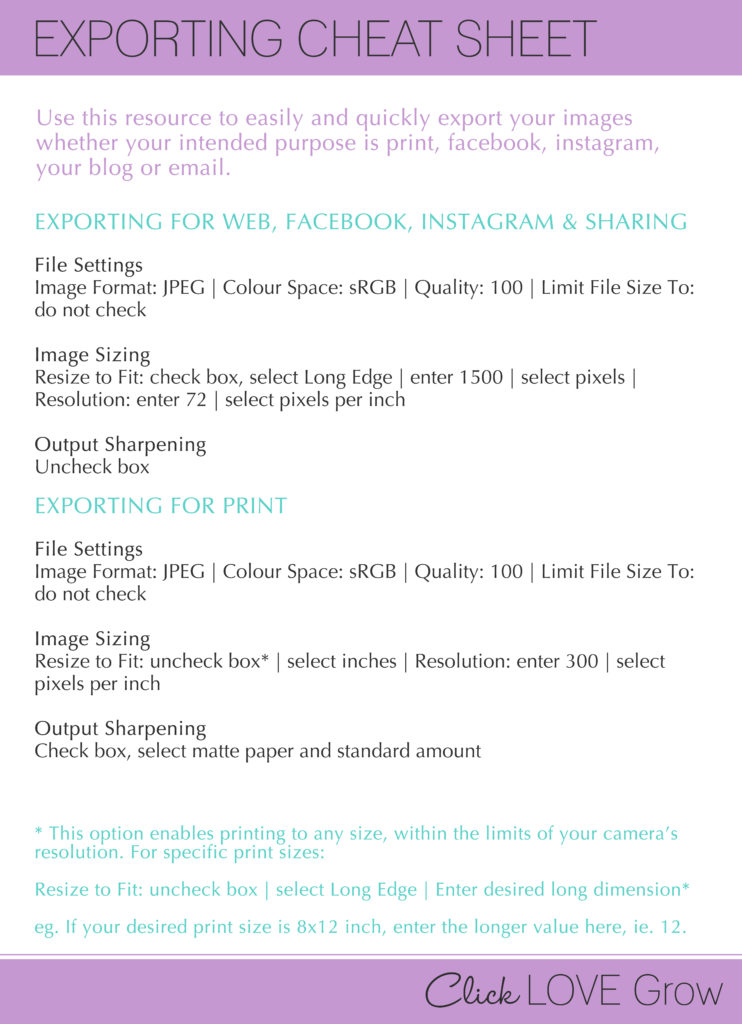
But wait… there’s more! We’ve also created an exporting cheat sheet, as a handy printable resource to help you make quick decisions when you want to export your images for any intended use.
So you can actually just skip ahead to that if you want the quick version 😀
Q. What’s The Big Picture?
This one is not an FAQ. Busted. But in the spirit of organised formatting (because I’m a bit special like that), I’ll start as I mean to go on.
I want to give you the big picture, because I can’t absorb details properly without first knowing the big picture it all fits into. And I just figure everyone else is like me.
The good news is, exporting and sizing for print or web is not as complicated as you think.
This is it in a nutshell – in order to get sharp and crisp images, whether it’s for print or web, your images need to be of a certain pixel resolution.
Q. What is ‘pixel resolution’?
A. Pixel resolution refers to the number of pixels per inch (ppi) or per cm (ppc) in an image.
Q. What is ‘document size’?
A. Document size is the physical dimensions of a printed image, eg. a 5×7 inch print.
This term is only seen in Photoshop, not Lightroom. But it’s one of those terms that can come up when printing so it’s worth mentioning.
Q. What is ‘pixel dimensions’?
A. Pixel dimensions is the total number of pixels in the width and height of an image.
You don’t need to determine pixel dimensions when exporting, but it does help to know how these three different units of measure for an image inter relate. To that end, pixel dimensions is a calculation of the document size x pixel resolution.
Again, this is more relevant to Photoshop.
![]()
Q. Can I export in a one size fits all uses?
A. Nope, sorry!
- Images for print need more pixels than images for web use or emailing in order to print crisp and clear. Printing a web sized image may turn out pixelated.
- Images for web use and emailing need to be a small file size that will display or transfer easily and quickly. If you attempt to transfer or upload a print sized image, it may fail to upload or transfer.
Q. What pixel resolution do I need for printing?
A. 240-300 ppi – regardless of the physical size you intend to print.
You’ll need 240-300 ppi to get a crisp, unpixelated print. Some print labs will suggest 240 as this is sufficient for printing and produces a smaller file size, but most people work with 300 ppi for print by default unless otherwise requested.
There are two ways to export an image for print:
- Maximum size (can print to any size, produces a large file)
- Specific size (eg. 8×12 inches) (can print any size up to the specified size, and produces a smaller file than the option above)
When exporting to maximum size, as long as you uncheck the ‘resize to print’ box and enter 300ppi in the pixel resolution box, it will print well at any size, within the confines of the resolution of your specific camera. It’s important to not get pedantic at this point… the average person is unlikely to have print needs beyond that which their camera can produce. In other words, don’t calculate, just print it.
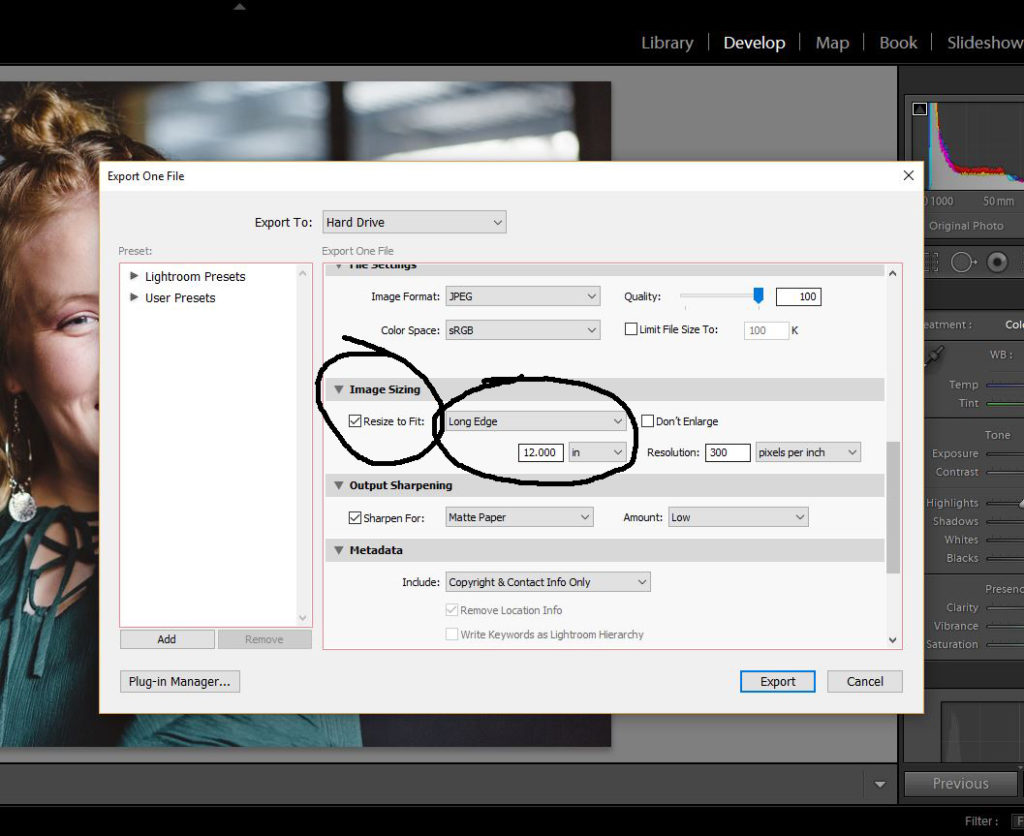
When exporting to a specific print size, you will also need to indicate the physical size in inches of your desired print eg. 8×12 inch print).
When exporting to a specific print size, the resulting photo dimensions (or document size), is your priority. So rather than attempting to calculate pixel dimensions, simply indicate the physical size of the print you want.
Under Image Sizing, check the Resize to Fit box, select Long Edge, enter the physical length of the long edge (in this case, 12 inches). As long as you enter 300 ppi in the resolution box, you will have enough pixels to print your specified size.
Q. What pixel resolution do I need for web?
A. 72 ppi – regardless of whether you intend to upload to Facebook, Instagram, your blog, or email your nana.
Contrary to the above with regard to printing, when it comes to images intended for web use, document size is irrelevant. It is the overall pixel dimensions that is the most important, so when we export or save for web, we enter total pixel dimensions on the longest side, and 72ppi. This will ensure clear viewing, as well as easy downloading and sharing.
Q. How do I crop images and ensure they’re the right size for print?
A. Sizing the image is dictated upon export, not when cropping.
When we talk about cropping, an understanding of aspect ratio is important. Aspect ratio of an image is the proportional relationship between its width and its height.
The reason it’s important to understand aspect ratio is because we crop for two purposes – for aesthetics, or to change the aspect ratio (or both).
Images come out of most DSLR cameras at a 2:3 aspect ratio, and will print perfectly at any 2:3 ratio size:
- 4×6, 6×9, 8×12, 10×15, 12×18, 16×24, 20×30, 40×60 inches and beyond
So if you want to print at any of the above sizes, you only need to crop for aesthetics or not at all.
How to Crop for Aesthetics
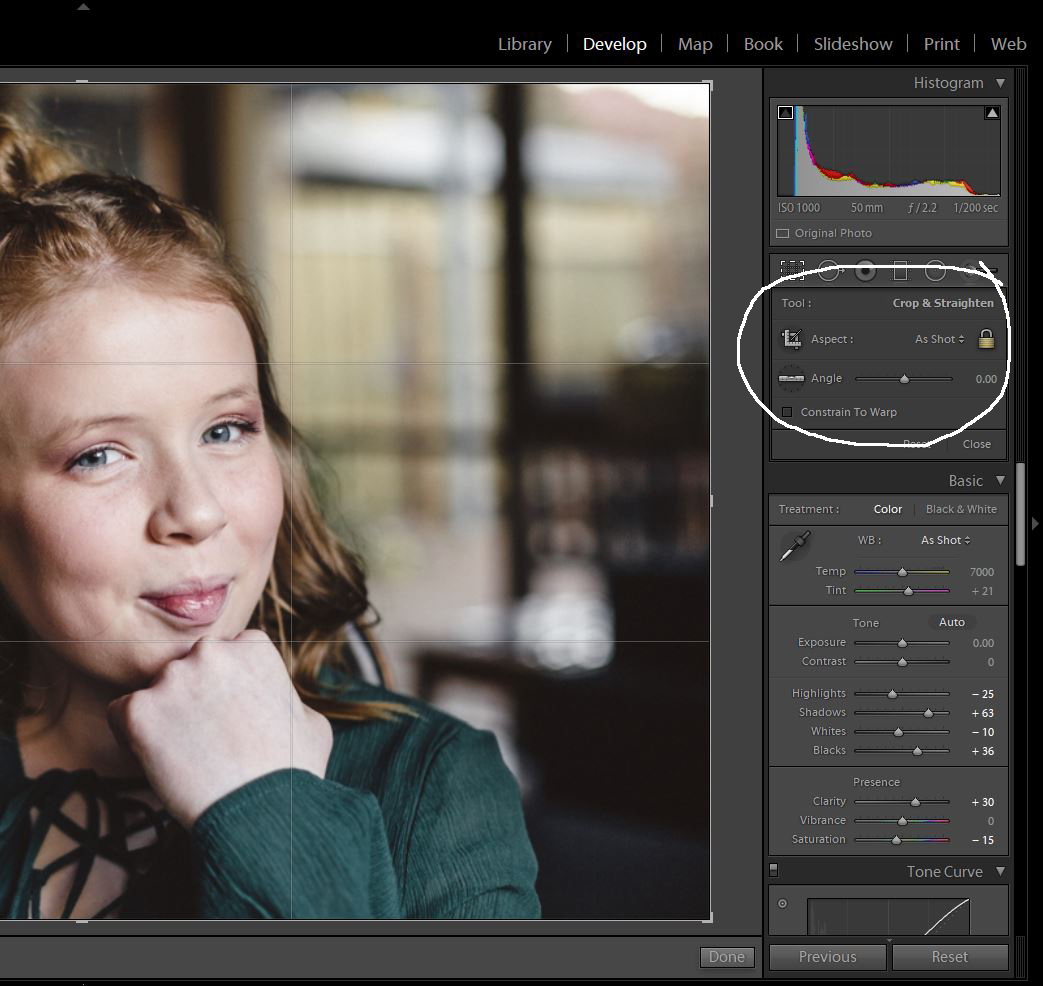
When you select the crop tool, ensure the aspect is set to “as shot”, and the padlock is locked. Only unlock the padlock if you want to crop free form (not to any specific aspect ratio).
However, more commonly people want to print to a ratio that is not 2:3, for example:
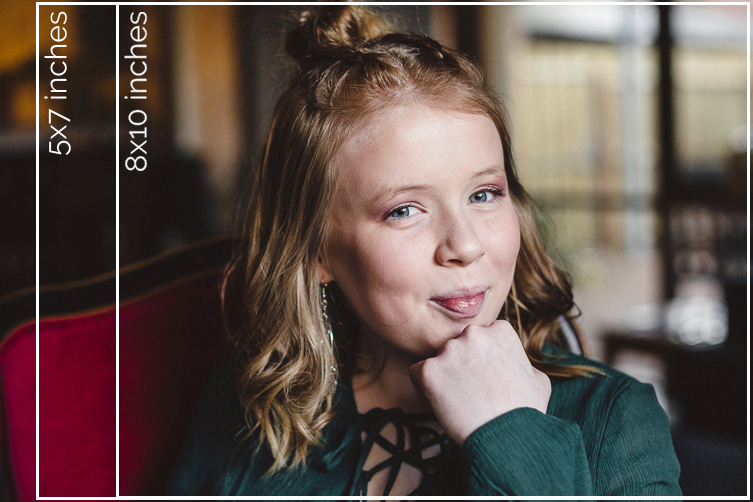
- 5×7, 8×10 and 11×14 inches are the most popular sizes
Printing to these non 2:3 sizes will result in some cropping of the image on the longest side. If you don’t do that yourself before exporting, the print lab will do it for you and you may not be happy with the placement of the crop. So always do that before you export for print.
How to Crop to Change Aspect Ratio
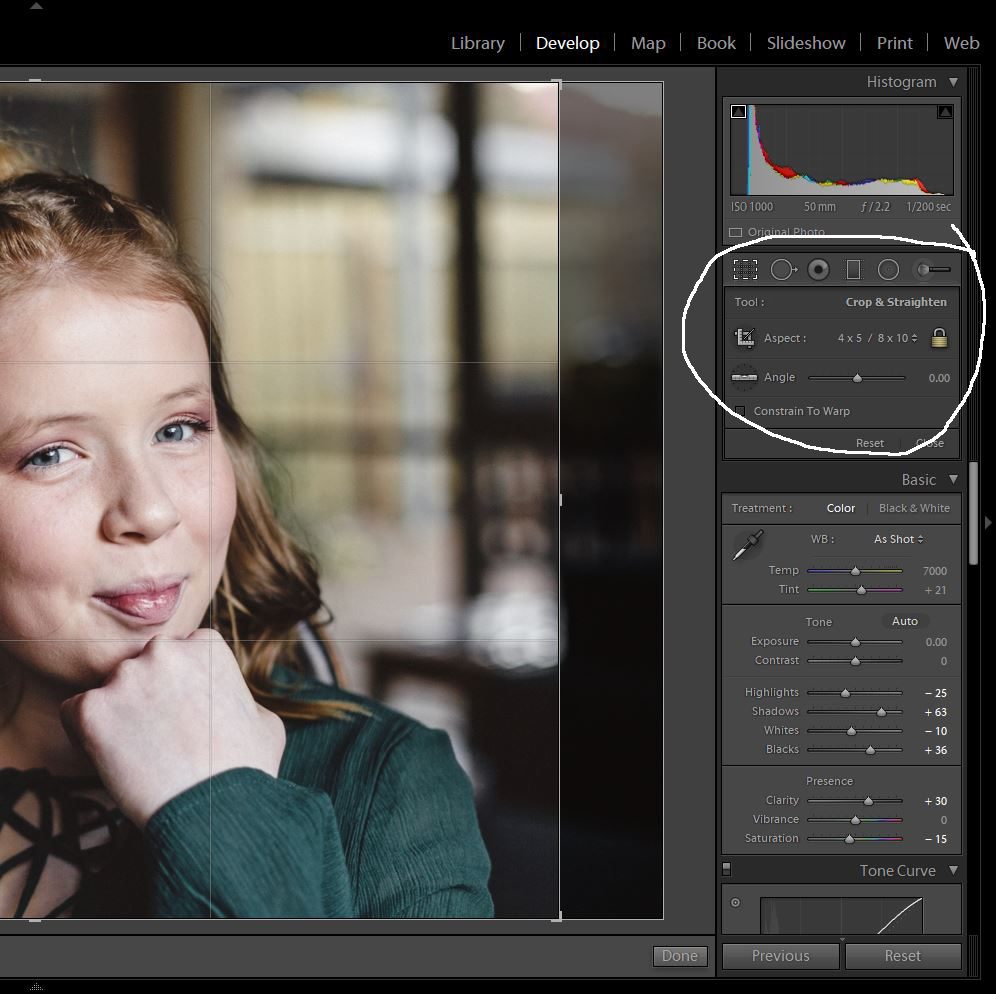
Select the crop tool, and from the drop down menu next to Aspect, select the relevant aspect ratio or size. Handily, Lightroom make it easy by denoting the image size as well as the aspect ratio. Then move the image within the window that appears until you’re happy with the crop.
However, it’s important to note… in this instance below, if I cropped to the chosen aspect ratio of 4×5 / 8×10 – this doesn’t mean my image is now sized to print for 8×10, or that I can’t print it bigger than 8×10. Lightroom is simply telling me 8×10 is an example of a 4:5 aspect ratio print size. So I’m cropping to the aspect ratio of 8×10. I will still need to size the image for 8×10 upon export. I could also size it for 16×20, or 32×40… as these sizes are a 4:5 aspect ratio.
When it comes to the next step (sizing on export), refer to our exporting cheat sheet to get it right each time.
Q. How do I size images for a friend or a client?
A. You don’t need to give them a version of every size known to womankind.
Personally, I give clients two versions of each image:
- A web version – 72ppi and 1500px on the longest side; and
- A print version – 300ppi and 20×30 inches. This means they can use this file to print any size up to 20×30 inches.
You could also opt to export to maximum size by unchecking the resize box. I have found this produces files too large to fit an entire gallery on a standard sized USB. I’ve never had a client ask for images larger than 20×30 inches, so this works for me.
You also don’t need to give them a version of every aspect ratio they might want to print.
I only crop my images for compositional purposes, keeping to their original 2:3 aspect ratio. If clients wish to print in an alternative ratio such as 5×7 or 8×10, they can do this but it will result in loss of some of the image on the longest side. If there is enough negative space on the long side they can get away with the crop without sacrificing much of the image.
Exporting Cheat Sheet
If you’re a Click Love Grow Student you can refresh yourself on exporting in Lesson Eight. Additionally, our free Lightroom Lesson walks you through a video example of exporting for different sizes!
In the meantime, we’ve created a cheat sheet which you can print off and keep handy to quickly refer to when exporting for any outcome.
Grab a copy of the cheat sheet here.
JOIN the Free 5 Day Mini Course
5 Days, 5 Videos Lessons = Photos You'll LOVE!
Learn How to Use Your DIGITAL Camera!
Join my new workshop and learn How to Shoot Pro-Quality Photos With Your DSLR… and it’s totally FREE to join! Register here…

Leave a Reply Cancel reply
PRIVACY POLICY & SITE TERMS AND CONDITONS
CLICK LOVE GROW ™ Pty Ltd - COPYRIGHT 2024 ©
x
Join Now
Enter your info below to join the challenge!
Want a friendly reminder when I go live?
Pop in your number and I’ll shoot you a text.
* We will send text reminders for our live calls during the challenge! Reply ‘STOP’ to end or ‘HELP’ for help.
We promise not to ever share your details with anyone or send you spam! Check our privacy policy and terms of service.
Be the first to comment