


Grab the Metering Modes Guide
Grab our free metering guide below to know which modes suit which shooting scenario... all in a handy checklist for when you’re out shooting.
Natural light is beautiful and abundant, we know that.
When you’re trying to take photos at home, I bet you’ve been here before… struggling to find the perfect light, then when you do, the background is cluttered or ugly. I bet you’ve tried every spot in and around the house at every time of day and found only frustration!
But there’s one spot you’ve probably overlooked in your search because it seems so unlikely, and that’s your garage.
Most garages have little to no natural light inside. Stand at the opening to your garage without turning on any overhead lights and look in…what do you see?
Not much, that’s my point. Lots of shadows, resulting in a dark backdrop with beautiful, soft natural light at the opening that’s perfect for portraits and products. You also have the kind beautiful, flattering soft light which comes from open shade.
The darkness within provides the opportunity for directional light which creates potential for beautiful dramatic imagery.
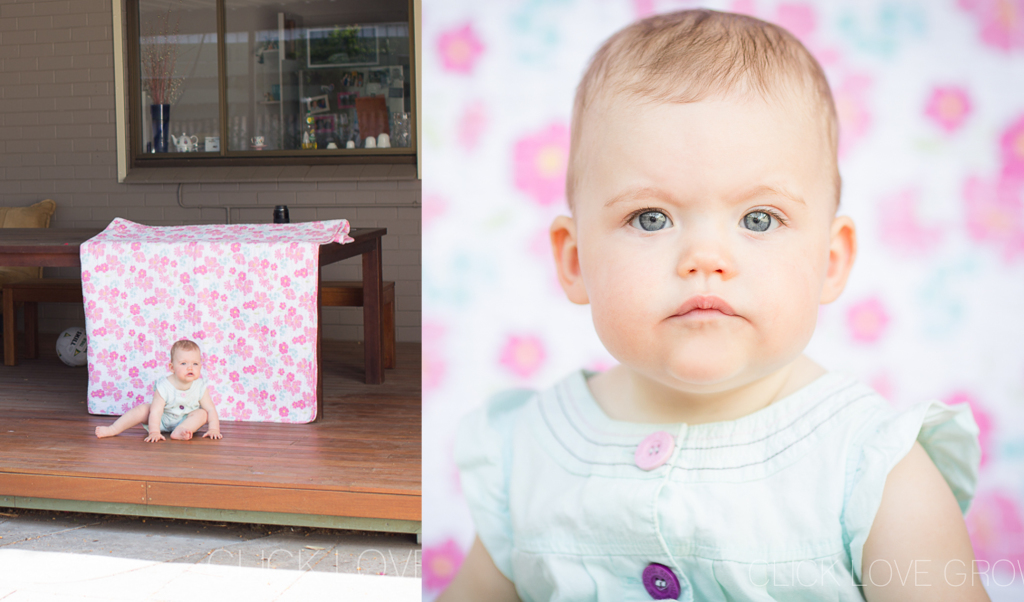
For something different, in this shot below I used a backdrop stand to drape a backdrop behind my subject. If you don’t have a backdrop stand, a clothes airer works just as well.

When shooting portraits, place your subject at the edge of the garage opening, turned at a 45 degree angle to the light source. In this position the shadow side will help shape their face and will create some depth and drama for a really dynamic portrait.
They should be just close enough to the garage opening that you see only gentle light on their skin and no hard patches of light. If they’re under exposed, then you’ve placed them too far from the garage opening.
There should be no light coming down on them from above which causes unflattering shadows under their eyes (the racoon effect).
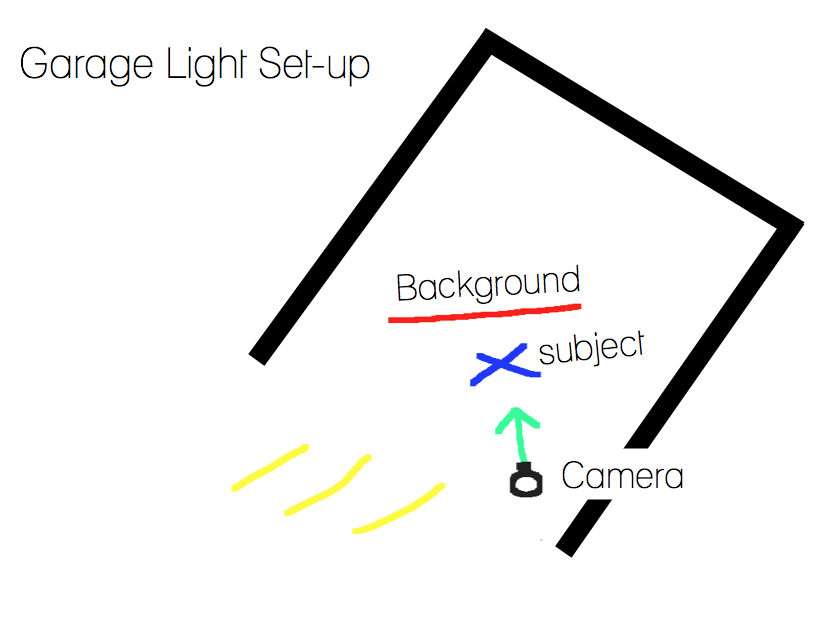
When you expose for your subjects skin, assuming your garage has no natural light, this will underexpose the garage interior. As a result, the contents of your garage won’t be really noticeable in the shot. However, keep your eye out for any brightly coloured distractions behind your subject so you can move them.
If you’re photographing product, the same principles apply. Experiment with the position of your product in relation to the light, taking test shots until you see a combination that flatters. Then photograph it from different angles and perspectives, close and wide, for variety.
With regard to exposure, you’d meter for the brightest highlight on the object.
Related: What is Metering
CLICK HERE to download our guide to metering modes to help you know which mode will help achieve the best exposure for your shot
You know what, I don’t even have a garage at my current house, but I use the exact the same principals with my outdoor patio!
It’s big open shade with closed in sides… and in the example below I used a bedspread from my girls’ bedroom to create a backdrop that worked beautifully!
You could really get creative at this point and place an old chair or sofa in the opening for your subjects to sit on.
For product or food photography, use a small table or other surface and make it pretty with a cloth and related props, or coloured project paper for a simple and striking backdrop.
I personally love bedspreads as they’re easy to find/use, and offer lots of versatility in colours etc. If you’re using patterned bed sheets or fabric, be mindful of creases as they’ll work to distract. So get the iron out if you need to!
Related: DIY Photography Backdrop
You just created a natural light home studio and it didn’t cost you a cent!
Related: Easy Living Room to Indoor Studio
JOIN the Free 5 Day Mini Course
5 Days, 5 Videos Lessons = Photos You'll LOVE!
Learn How to Use Your DIGITAL Camera!

CLICK LOVE GROW ™ Pty Ltd - COPYRIGHT 2024 ©
Enter your info below to join the challenge!
Want a friendly reminder when I go live?
Pop in your number and I’ll shoot you a text.
* We will send text reminders for our live calls during the challenge! Reply ‘STOP’ to end or ‘HELP’ for help.
We promise not to ever share your details with anyone or send you spam! Check our privacy policy and terms of service.
Be the first to comment